Leif the Adventure Van for the most part looks like any other old, sketchy white work van that you see in any given parking lot. But Leif is my ride to adventure.
Leif’s Backstory
Leif is a 1999 Chevy Express 1500. Not super powerful, but strong enough to get the job done. I picked him up years ago when I was still doing painting and remodeling and when I quit doing that, he was one of the vehicles I decided to keep. A van for hauling things around is always handy right?
As vehicle goes, he is not pretty. The wheels don’t all match and before I got him, someone had bumped into something and so the front left corner isn’t quite straight. His paint job is still a bit ugly, and along the way things had gotten dripped across the bumper in the back. Inside, he had a partition between the front and back and a bare bones interior with just two metal shelves for storage from a former life.
For quite a while Leif sat unused until I got serious about making him a weekend adventure van. The goal was, and still is, to make him a vehicle that I can throw a cooler full of food in and more or less be ready to go on the weekends. The biggest obstacle to weekend adventures is the organizing of everything that needs to go. Leif has most of that ready and waiting. As it stands now I just need food and any special gear I might need for any given adventure, and I’m ready to roll.
The start of Leif’s transformation
After a general cleanout, the first thing that got done was the ceiling insulation. He was essentially a pop-can inside so he was super cold in the winter and hot as hell in the summer, even if he is painted white. So insulation was a must.
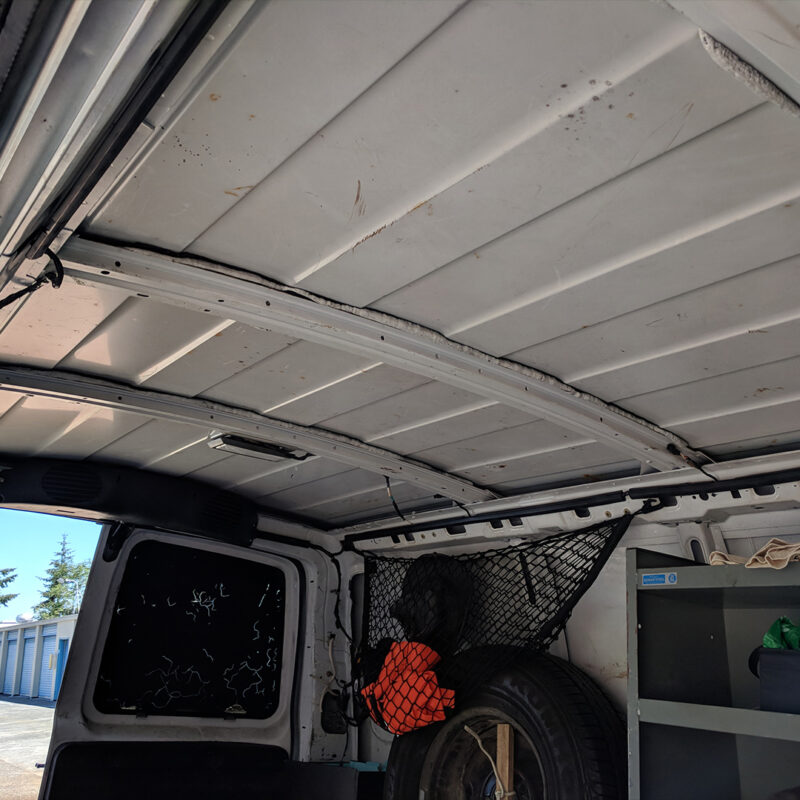
The first thing to get done was to insulate the ceiling, as it was the biggest heat sink/source depending on the season, and the easiest to get at. After reading LOTS of van-life forums I settled on 1″ Polyisocyanurate foil covered foam. Main advantages for me is that it fit perfectly in the space afforded by the structural ribs in ceiling, leaving a small air gap between it and Leif’s metal skin.
With any faced insulation, you want some sort of air gap so that the foil can do its job of reflecting heat back out. Additionally the polyiso is durable enough to put up with the vibrations of a moving vehicle and is relatively easy to work with. On top of that, it was relatively inexpensive at ~$25 a sheet at the local big-box hardware store.
To hold it all in place and to give me something to mount finish material to, I screwed some plywood strips to the structural ribs using 1″ self tapping screws.
The first bed platform in Leif
The ceiling insulated, I turned my attention to a bed, even a temporary one. The solution was an old futon matress that I had saved from my bachelor years, and I decided to try and put in sideways like most van-life people do. This required removing one of the metal shelving units and building a platform out of plywood.

If I’m being honest, this configuration was sufficient for a very long time and Leif’s rebuilding took a backseat to other things in life for quite a while. But even at this point, half the battle was won. I had a dry place to sleep if I went anywhere, it held anything I needed to take along, and stayed cool in the summer. It was still very cold in the winter as I found out when I took it for a test run out to the Dungeness Spit in the late fall.
The only issue I had with this configuration is that I am 6’4″ and taller than the van is wide, so I wound up always needing to be curled up on the bed, which isn’t ideal and didn’t leave room for any company other than my dogs. I would eventually decide to change this later on as I would need to be comfier and have room for company.
A ceiling at last
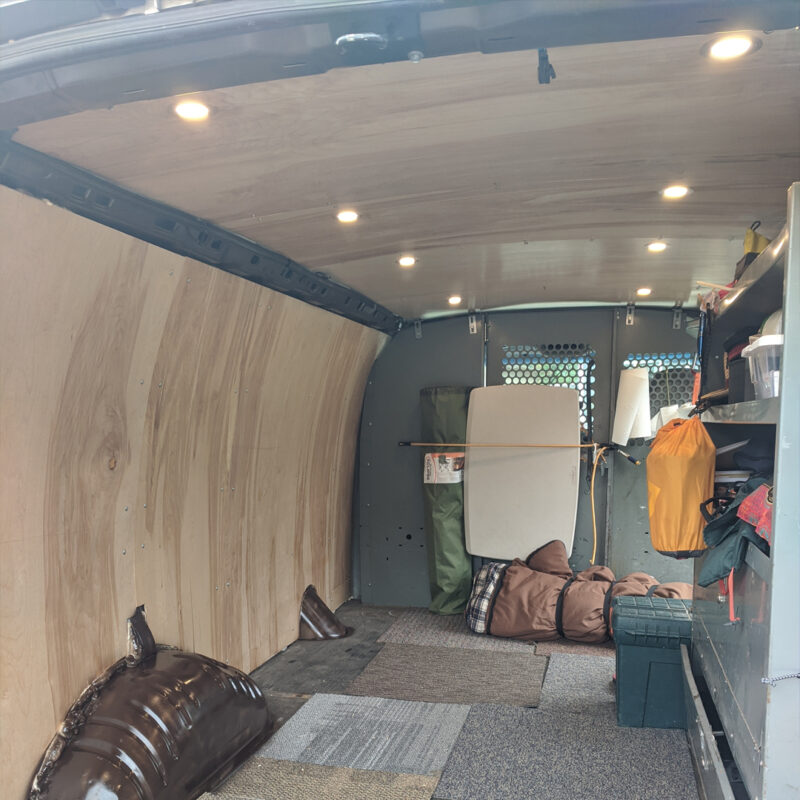
Eventually I got tired of looking at my foil ceiling and found a material to cover up the interior. What I found was some 3mm plywood underlayment, usually used for putting down on countertops before you lay down tile. It came in 4′ by 8′ sheets, looked decent, and was light weight. All I did to it was cut the panels I needed, sanded them a couple times and applied a couple coats of water based polyurethane to them.
For attaching them to my ceiling, I just used some 1″ lath screws that have a wide head so they wouldn’t pull through the sheeting as Leif vibrated down the road.
Later on I would switch to 5mm underlayment to do the walls in Leif.
Time for a shitter
The first part of 2020 before he world went sideways, I wanted to go to a UFO confrence in Ocean Shores. Why pay for a hotel room when I can stay in my van. They allow people to stay in their RV lot, but you have to be “self contained” meaning have a way to go to the bathroom in your vehicle, and yes they do check if they are suspicious.
To solve this problem I picked up a chemical toilet and some treatment tabs. So far this thing has been awesome. No one loves getting up in the middle of the night to wander off to the bathroom in the dark, especially if it is raining. A toilet in the van solves this problem and makes life much easier.
The unit I got was a Thetford Porta Potti 345 along with some packs of tank deodorant. I’ve had the van out for the weekend and haven’t filled it up yet. If you were really worried about that, you could always use the bushes for peeing during the day and save the toilet for nighttime.
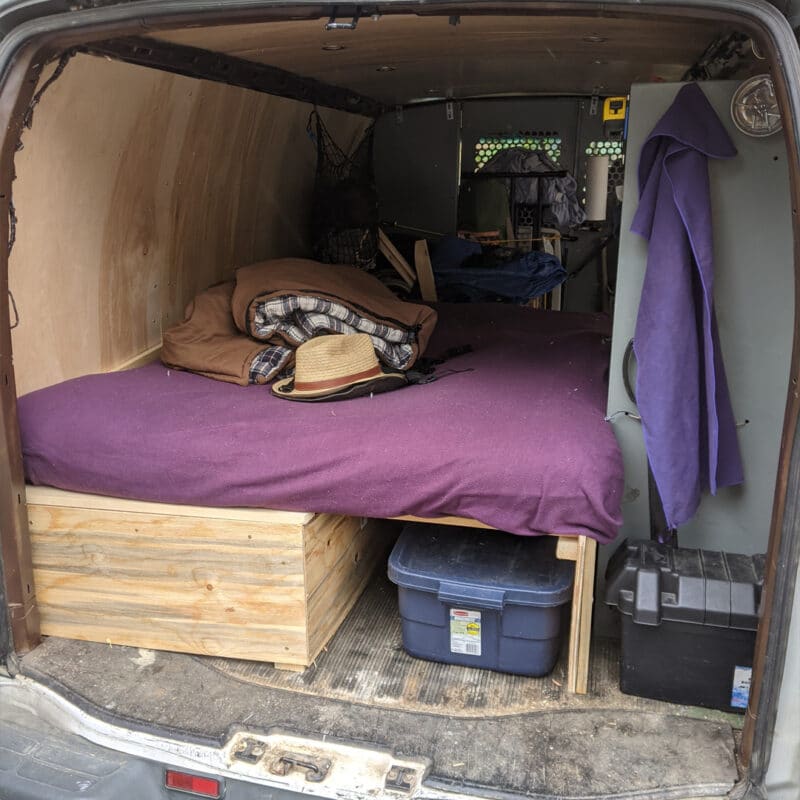
A new bed that I fit in, sort of
Summer of 2020 and I was tired of being cramped up in my bed and ready to move on to the next phase of Leif’s transformation. It was time to move the bed. This would mean losing some floor space, but I figured it was more important to be able to sleep comfortably than to have a larger floor space.
Out came the old platform, up went some insulation in the side walls, the shelf that was on the driver’s side got moved to the passenger’s side and the sheeting went up on the walls. This left me wondering how to build my bed. Deciding on this would take a while so I worked on another critical project in the meantime, lighting!
Let there be light!
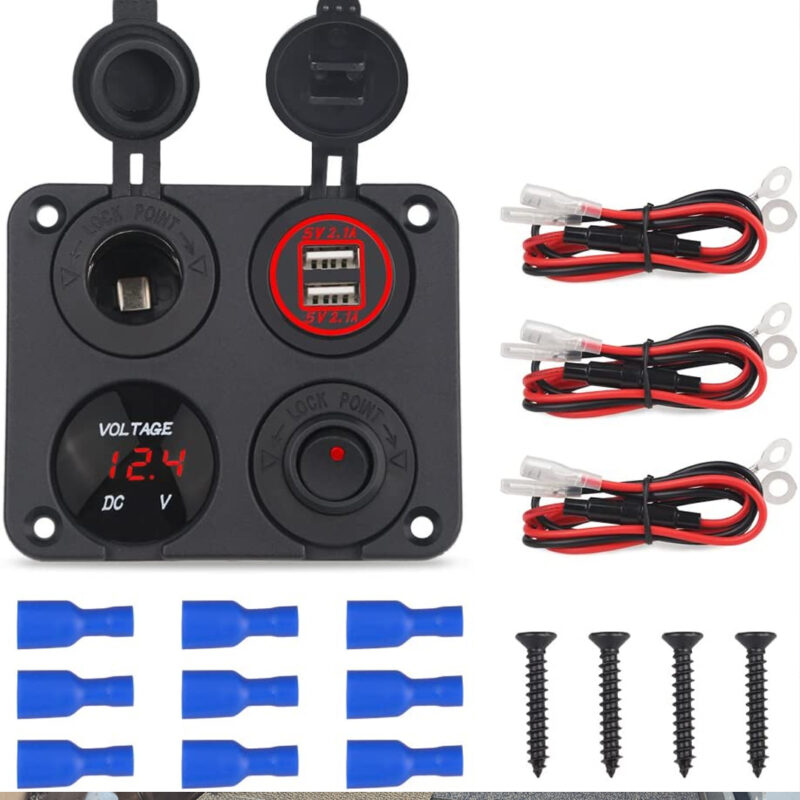
Leif is dark inside at night, I mean really dark. Someone painted the windows black and even though that paint has cracked, it is really dark inside him at night. To solve this, I needed to add some interior lighting. The obvious choice was some recessed LED pucks. These were pretty simple to connect with some T-wire taps, a hot and cold wire, and a small control panel (Amazon Link).
The control panel is a bit basic, but it has everything I needed, at least to start. On/Off switch for the light, basic power meter and some USB plugs for charging phones. It even came with a fuse, which wasn’t ideal, but sufficient for my needs at the time.
For lights, I went with 8 of these lighting pucks (Amazon Link) and they have springs that hold them in place against the roof sheeting. The only challenge I had was that I was too cheap to buy a drill that was exactly the right size, but had one that was close. I just had to make some notches to accommodate the springs.
At the time, I couldn’t find an LED compatible dimmer that I liked. With 8 of these lights in Leif, I really need one and will install one in the future. It is VERY bright in there at night, provided that the battery is fully charged. Being able to dim them a little would really be nice and is in the plans after some other things get done. For now, I’m using some copper wire USB plug-in fairy lights (yup Amazon link) as “mood lighting” in Leif and they work admirably.
Back to building a real bed
After installing lights and pondering the bed situation, I decided I needed something movable. The mattress almost exactly filled the space from the driver’s side wall to the metal shelving on the passenger’s side. I wanted to keep some ability to shove big things in there, like sheets of plywood, so I settled on a slide out design for the bed. Great theory, still working on the practical aspects.

Most of the problems were getting that first board scribed and parallel to the shelves on the opposite side of the van. that took some doing and came down to installing temporary boards across the back to support the ledger board so I could scribe it. That being done, the rest was relatively easy aside from doing the math on the lengths of the slide pieces.
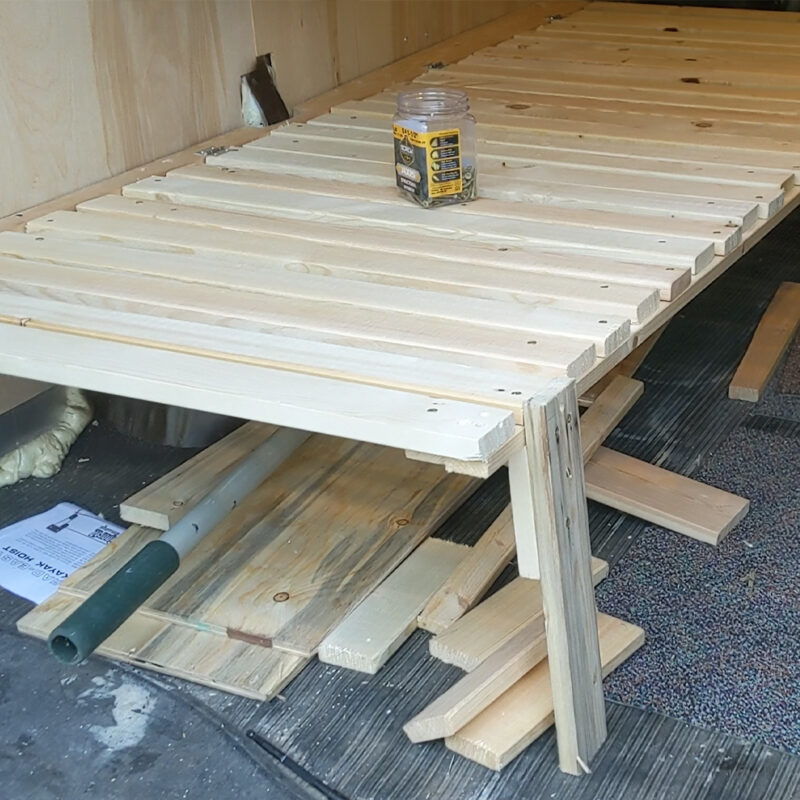
All in all, the design is good, but I need to do some tweaking. As it stands, it doesn’t slide well and gets off-center. Additionally the mattress needs to get split so it is more easy to move. Plus I think I want a drawer on the end that holds all the kitchen stuff.
What is left to do in Leif
There is still a bunch left to do to Leif this summer. Here is a short list of items that I want to get done.
- Install a battery holder under the frame
- Install a battery isolator/charger
- Mount the spare tire back under the body where it belongs
- Build a new base for the bed with a drawer
- Add a shelf to the windows
- Add a cooking table to the back door
- Add a dimmer to the lights
- Build a cabinet for the back of the metal shelf
- Install a diesel powered heater
- Build a cabinet for the toilet and possibly a fridge
- Add a cell phone booster
- Rebuild the motor and add 4WD
If all this gets done, Leif will be badass and ready for just about any adventure!
4/14/21 Repairs Update
A funny thing happened on the way to the Ancient Lakes 25k Trail Run. Not a good funny thing though.
When we got to the campground, Leif wouldn’t start. Cranked great, but wouldn’t catch. After much head scratching, I disconnected and reconnected the battery. Started right up.
Then the next thing is driving out the next morning, the engine just shut off while going down the road. Put it in neutral while rolling, cranked it and it started right up again. The rest of the day it ran fine.
The next morning it did the exact same thing, then ran fine until the Vantage Hill when he just suddenly didn’t have any power. Foot to the floor, engine not going faster sort of lose power. Same unplug-plug trick and we were on the road again. Until I got to Bellevue, then it cut out again and wouldn’t start. not even after the unplug/plug trick.
A few days later and the diagnosis comes back as a faulty crankshaft position sensor. Three hundred dollars later and Leif is back in action. Interestingly enough, not only is he running again, but the engine rattle is gone and it shifts smoother. Very crazy.
9/28/24 A New Tire Pressure Monitoring System
Not being a fan of flat tires and doing a lot of road trips, I found out that they make aftermarket tire pressure monitors, so I picked a set up for Leif. Honestly, I’m pretty happy with them, and they have shown me how my tires are doing on my long road trips and up sketchy backwoods roads.
My big thing is being able to see that one is going flat as I’m driving so I can catch it before it is totally flat. That makes changing it easier and potentially saves the tire from having to be completely replaced.
Here is a link to the full review on these, as well as a video.